You’ve fumbled with keys in the rain, worried about lost copies floating around, and wondered if your front door is truly secure. Traditional locks leave you guessing and vulnerable. Smart locks eliminate these headaches by offering keyless entry, remote access, and real-time security alerts. This guide walks you through every step of installing a smart lock yourself, from checking compatibility to troubleshooting common issues, so you can modernize your home security with confidence and avoid the costly mistakes that derail most DIY installations.
Table of Contents
- Key takeaways
- Check door compatibility and gather materials
- Step-by-step installation process
- Troubleshooting common issues and maintenance tips
- Explore top smart lock options and smart home tips
- How long does it usually take to install a smart lock?
Key Takeaways
| Point | Details |
|---|---|
| Compatibility checks | Sixty eight to ninety percent of installation failures occur when door thickness, backset, or lock types are not verified before buying. |
| Measure door dimensions | Measure door thickness and backset to ensure the lock fits and avoids extra drilling or misalignment. |
| Identify door type and handing | Determine door type and swinging direction so the lock is compatible and the deadbolt extends correctly during setup. |
| Gather and prep tools | Collect the screwdriver, required batteries, and drill if needed, and read the installation manual first. |
| Seek professional installation | For complex doors or uncertain DIY skills, have a professional install to prevent damage and ensure proper operation. |
Check door compatibility and gather materials
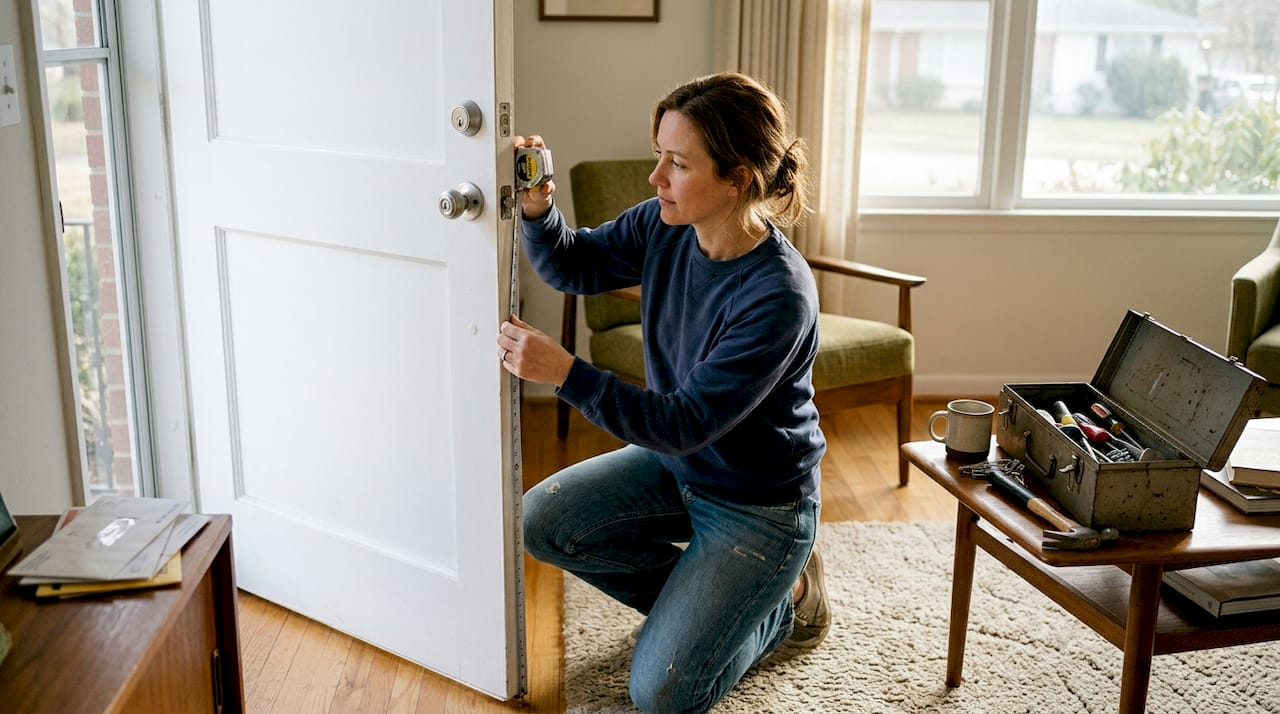
Before you buy any smart lock, you need to verify your door can accommodate it. 68-90% of installation failures happen because homeowners skip compatibility checks on door thickness, backset distance, and lock types. Measure your door thickness with a ruler at the edge where the lock sits. Most residential doors are 1.375 to 1.75 inches thick, which standard smart locks handle easily. Next, measure the backset, which is the distance from the edge of the door to the center of the existing lock hole. Standard backsets are 2.375 or 2.75 inches. Your new smart lock must match this measurement or you’ll need to drill new holes, adding complexity and risk.
Identify your door type. Standard single-bore doors work with most smart lock options, but storm doors, French doors, and multipoint locking systems require specialized models. Check your lock handing orientation by standing outside and noting whether the door swings left or right. Some smart locks need this information programmed during setup to ensure the deadbolt extends correctly. Inspect for metal reinforcement plates or warped door frames that could block installation. If you spot these issues, professional help prevents damage and wasted money.
Gather your tools before starting. You’ll need a Phillips head screwdriver, the batteries specified by your lock manufacturer (usually four AA batteries), and potentially a drill with bits if you’re switching lock types. Read your smart lock’s installation manual completely before opening packages. Different models have unique requirements for door prep and wiring.
Pro Tip: Take photos of your existing lock setup before removing anything. These images become invaluable references if you need to troubleshoot alignment or reinstall your old lock temporarily.
Create a compatibility checklist:
- Door thickness between 1.375 and 1.75 inches
- Backset measurement of 2.375 or 2.75 inches
- Standard single-bore door without multipoint locks
- No metal obstructions in lock cavity
- Door closes flush without gaps or warping
- Existing deadbolt operates smoothly without sticking
| Measurement | Standard Range | How to Measure |
|---|---|---|
| Door Thickness | 1.375 to 1.75 inches | Use ruler at door edge where lock installs |
| Backset | 2.375 or 2.75 inches | Measure from door edge to center of lock hole |
| Strike Plate Depth | 0.875 inches standard | Measure door frame recess for latch |
| Cross Bore Diameter | 2.125 inches typical | Measure existing hole diameter through door face |
Step-by-step installation process
Start by removing your existing lock hardware. Unscrew the interior thumb turn assembly first, then remove the exterior lock cylinder. Keep all screws organized in a small container because some smart locks reuse original hardware. Pull out the deadbolt mechanism from the door edge and set everything aside. Clean the lock cavity with a dry cloth to remove debris that could interfere with your new lock’s operation.
Install the new deadbolt into the door edge hole. The deadbolt should slide in smoothly without forcing. If it sticks, check for burrs or paint buildup in the cavity. Secure the deadbolt with the provided screws, ensuring it sits flush against the door edge. The latch face plate must align perfectly with the door edge or your lock will jam. Test the deadbolt by manually extending and retracting it several times. It should move without resistance.
Mount the exterior lock assembly next. Thread any required cables through the door carefully, avoiding kinks or pinches that cause connectivity failures later. Align the lock cylinder with the deadbolt tailpiece, which is the piece that actually turns the bolt. This alignment is critical. If the tailpiece doesn’t engage properly, your smart lock won’t operate. Secure the exterior assembly with mounting screws, but don’t overtighten. Stripped screw holes are a common DIY mistake that weakens security.

Program the lock handing before installing the interior assembly. Most smart locks have a small switch or button sequence that tells the motor which direction to turn. Consult your manual for the exact process. Install batteries in the correct orientation, following the polarity markings. Reversed batteries won’t damage the lock but will prevent operation. Attach the interior assembly, connecting any cables to their designated ports. The interior and exterior halves should sandwich the door snugly without gaps.
Pro Tip: Avoid power drills for final screw tightening. Hand screwdrivers give you better feel and control, preventing stripped threads that compromise your lock’s security and warranty.
Connect your lock to its companion app via Bluetooth or WiFi. DIY installation achieves a 90% success rate when you follow manufacturer connectivity steps precisely. Download the app, create an account, and follow the pairing prompts. Most locks enter pairing mode automatically on first power-up. If yours doesn’t, check the manual for the button sequence to activate pairing mode. Enter your WiFi credentials carefully, as typos cause connection failures.
Test every function before considering installation complete:
- Manually extend and retract the deadbolt from both inside and outside
- Lock and unlock using the keypad or app
- Test auto-lock functionality if your model includes it
- Verify access codes work correctly
- Check that the door latches properly when closed
- Confirm the strike plate alignment allows smooth bolt extension
Adjust the strike plate if the deadbolt doesn’t extend smoothly into the door frame. Loosen the strike plate screws, extend the deadbolt, then shift the plate until the bolt slides in effortlessly. Retighten the screws and test again. This adjustment prevents the motor strain that shortens smart lock lifespan. Refer to detailed smart lock installation guides for model-specific setup variations and advanced features like geofencing or voice control integration.

Troubleshooting common issues and maintenance tips
Deadbolt misalignment tops the list of post-installation problems. If your lock struggles to extend or makes grinding noises, the strike plate needs adjustment. Latch misalignment and cable problems cause most failures, but monthly maintenance prevents 90% of these issues. Loosen the strike plate screws slightly and test the deadbolt extension while adjusting the plate position. The bolt should slide into the frame hole with zero resistance. If adjustment doesn’t help, check if your door has settled or warped since the original lock installation. Warped doors may need professional shimming or frame repair.
Battery failures catch homeowners off guard. Most smart locks warn you weeks before batteries die, but ignoring these alerts leaves you locked out. Replace batteries annually as preventive maintenance, even if the lock hasn’t issued warnings. Keep a spare set of batteries in a kitchen drawer, not in the lock packaging you’ve already thrown away. If your lock stops responding after battery replacement, remove and reinstall the batteries, ensuring proper contact with the terminals. Corrosion on battery contacts prevents power flow. Clean terminals gently with a pencil eraser if you spot white or green buildup.
Connectivity issues frustrate users who expect seamless app control. Common problems include connectivity troubles, with fixes including signal strength checks and factory resets. If your lock won’t connect to WiFi, verify your router broadcasts a 2.4GHz network, as most smart locks don’t support 5GHz bands. Move closer to your router during initial setup to eliminate distance as a variable. Bluetooth locks require your phone within 30 feet for operation. If the app can’t find your lock, restart both your phone and the lock by removing and reinserting batteries.
Factory reset solves persistent connectivity problems but erases all settings and access codes. Locate the reset button or sequence in your manual before you need it urgently. Most locks require holding a specific button for 10-15 seconds or entering a master code sequence. After reset, you’ll need to reprogram everything, so keep your access codes documented securely.
Pro Tip: Create a monthly smart lock maintenance routine on the first day of each month. Check battery levels, test all access methods, clean the keypad, and verify the deadbolt extends smoothly. This 5-minute habit prevents emergency lockouts and expensive service calls.
Establish a maintenance checklist:
- Test manual and electronic lock operation monthly
- Replace batteries annually or when low battery warning appears
- Clean keypad with slightly damp cloth to remove dirt and oils
- Lubricate deadbolt mechanism yearly with graphite powder, never oil
- Verify strike plate alignment hasn’t shifted
- Update lock firmware through the app when prompted
- Review and remove old access codes you no longer need
- Check that weather stripping isn’t interfering with lock operation
“The most reliable smart locks are the ones that receive regular attention. A few minutes of monthly maintenance prevents the majority of service calls and extends lock lifespan by years.” This principle applies across all smart home devices, not just locks.
Stiff operation indicates the deadbolt needs lubrication or the door has shifted. Apply graphite powder, not liquid oil, to the deadbolt mechanism. Oil attracts dust that eventually gums up moving parts. If lubrication doesn’t help, check if seasonal temperature changes have caused your door to swell or contract. You might need to adjust the strike plate or plane the door edge slightly. These adjustments fall within DIY capabilities for most homeowners, but don’t hesitate to call a locksmith if you’re uncertain. Explore more about the benefits of smart locks and how proper maintenance maximizes your investment in home security technology.
Explore top smart lock options and smart home tips
Now that you understand the installation process, you’re ready to choose the perfect smart lock for your home. Smart Home HQ offers curated reviews of the best smart locks available in 2026, with detailed comparisons of features, compatibility, and real-world performance. Whether you prioritize keypad entry, biometric scanning, or seamless smart home integration, you’ll find tested recommendations that match your security needs and budget.

Discover why millions of homeowners are making the upgrade to smart locks this year. Beyond convenience, smart locks provide security features impossible with traditional hardware, from temporary access codes for guests to instant alerts when someone enters your home. Ready to expand your smart home ecosystem? Our guide to smart home setup best practices helps you integrate locks with cameras, lighting, and other devices for comprehensive home automation that actually works together.
How long does it usually take to install a smart lock?
Professional installation typically takes 1-2 hours, covering removal of old hardware, new lock installation, and connectivity setup. DIY timing varies based on your experience and door condition. First-time installers should budget 2-3 hours to work carefully through each step without rushing. This includes reading instructions, checking compatibility, and testing all functions thoroughly. Preparation significantly impacts timing. Having all tools ready and understanding your specific lock model before starting cuts installation time substantially. Complex doors or troubleshooting connectivity issues can extend the process, so start your installation when you have an entire afternoon available rather than squeezing it into a tight schedule.
Can I install a smart lock on any type of door?
Standard residential doors with single-bore locks are ideal for DIY smart lock installation. These doors have straightforward construction that accepts most smart lock models without modification. Non-standard doors, metal obstructions, or special locks may require professional installation or adjustments to avoid damage. Storm doors, French doors, and doors with multipoint locking systems need specialized smart locks designed for their unique configurations. Metal security doors sometimes have reinforcement that blocks standard lock installation. If your door has unusual features or you encounter unexpected obstacles during prep, consult a professional locksmith. The cost of expert installation is far less than repairing a damaged door or buying a second lock after the first one doesn’t fit.
What maintenance is required for smart locks?
Check your lock’s operation monthly by testing both manual and electronic functions. This quick test catches problems before they leave you locked out. Monthly maintenance and annual battery replacement prevent most issues that plague smart locks. Clean the keypad with a slightly damp cloth to remove fingerprint oils and dirt that can interfere with button response. Inspect the deadbolt mechanism for smooth extension and retraction. Apply graphite powder annually to keep the bolt moving freely. Verify the strike plate hasn’t shifted and the door still closes flush. Update firmware through your lock’s app whenever the manufacturer releases new versions, as these updates often include security patches and performance improvements. Remove outdated access codes you no longer need to maintain security.
What should I do if my smart lock loses connectivity?
Start by checking your Bluetooth or WiFi signal strength near the lock. Weak signals cause intermittent connectivity that appears as random failures. Fixes include checking signal strength and performing a factory reset when other solutions don’t work. Move your WiFi router closer to the door or add a mesh network node to boost signal. Restart your smartphone and the lock by removing batteries for 30 seconds. Verify your home network hasn’t changed passwords or settings. If the lock still won’t connect, perform a factory reset following your manual’s instructions. This erases all settings but often resolves stubborn connectivity problems. After reset, set up the lock as if it’s new, ensuring you’re within close range of your router during the initial pairing process.
Recommended
- Best Smart Lock 2026: Comparison of Top Models
- Why Upgrade to Smart Locks: Enhancing Security at Home
- Benefits of Smart Locks: Safety & Convenience | Yale Key‑Free
- Smart Lock Archives – Smart Home HQ