Upgrading home security can feel daunting, especially when different devices and features all promise the latest protection. For urban homeowners balancing safety, privacy, and everyday convenience, choosing and installing a DIY smart security system installation is about more than just mounting cameras. Compatible smart devices and real-world testing are crucial for reliable coverage, helping you avoid expensive mistakes and close hidden gaps. Get practical steps and expert tips that streamline the process, so you build a system that truly fits your home’s needs.
Table of Contents
- Step 1: Assess Your Home’s Security Needs
- Step 2: Select Compatible Smart Security Devices
- Step 3: Prepare Your Space and Gather Tools
- Step 4: Install and Connect Smart Sensors and Cameras
- Step 5: Configure System Settings and Integrations
- Step 6: Test and Verify Full System Operation
Quick Summary
| Important Insight | Explanation |
|---|---|
| 1. Assess Your Home Security Needs | Evaluate entry points and vulnerabilities to determine necessary security devices and placements. This prevents overspending on ineffective equipment. |
| 2. Choose Compatible Devices | Ensure all devices integrate with a central hub and share communication protocols to avoid compatibility issues during installation. |
| 3. Prepare Before Installation | Clear the workspace, gather tools, and analyze Wi-Fi coverage to avoid connectivity problems when setting up your security system. |
| 4. Test All Components Thoroughly | Verify each device’s functionality and integration to ensure the system provides real-time alerts and behaves as expected during security events. |
| 5. Document Your Configuration | Keep records of device settings, passwords, and testing results for future reference, which simplifies troubleshooting and system maintenance. |
Smart Security System Installation – Step 1: Assess Your Home’s Security Needs
Before you buy a single camera or sensor, take time to honestly evaluate what you’re actually protecting and where your vulnerabilities exist. This step determines everything that follows, from which devices you’ll need to how many entry points require monitoring. Skip this assessment and you’ll likely waste money on redundant equipment or leave critical gaps in your coverage.
Start by walking through your home like you’re seeing it for the first time. Which doors and windows do visitors use most often? Where are your valuables stored? If someone wanted to enter your home without permission, what would be their easiest path? Ground floor windows near bushes that provide cover? A side door hidden from street view? A sliding glass door in the back? Pay attention to these vulnerable spots because they matter more than theoretically ideal camera placement.
Next, consider what you actually want to monitor beyond break-ins. Are you concerned about package theft from your porch? Do you want to check on deliveries or service workers while you’re away? Are pets roaming your yard that might trigger motion sensors? Do you need to monitor a home office, garage, or outdoor storage area? Each of these scenarios influences which cameras, sensors, and smart locks make sense for your situation.
Dimensions and layout factor in too
Is your home a compact apartment where a few strategically placed cameras cover everything, or do you have multiple levels, a large yard, or separate structures like a garage or shed? The physical layout affects WiFi signal strength, camera mounting options, and whether a wireless system will actually work for you. Consider your internet connection speed as well, since multiple camera feeds and constant monitoring demand reliable bandwidth. If your WiFi drops regularly or you have slow upload speeds, that’s a real constraint you can’t ignore. You should also think about your comfort level with different technologies. Do you prefer local storage on a hub or cloud storage? Are you concerned about privacy implications of certain systems? Will you realistically monitor alerts, or do you need passive recording? There’s no wrong answer, but your preferences shape which system you’ll actually use consistently.
To make this assessment concrete and actionable, work through an actual home security checklist that walks you through entry points room by room. This ensures you’re not missing obvious vulnerabilities or overthinking low-priority areas. Write down your answers because what seems obvious now gets fuzzy when you’re standing in an electronics store comparing specs. Note which areas need 24/7 monitoring versus occasional checking, which need video versus motion or door sensors alone, and what kind of alerts matter to you. This inventory becomes your shopping list and installation roadmap.
Pro tip:
Take photos or video of your home’s entry points and vulnerable areas during different times of day to see how lighting affects camera placement. What looks like a clear sightline at noon might be completely backlit at dusk, and you’ll want to know this before mounting expensive equipment.
Smart Security System Installation – Step 2: Select Compatible Smart Security Devices
Now that you know what you need to protect, the real challenge begins: choosing devices that actually work together. Nothing derails a DIY smart security project faster than buying components that refuse to communicate or require multiple apps and separate hubs. The goal of this step is to identify devices that share common communication standards and integrate into a unified system you can control from one place.
Start with the hub or central control system because everything else flows from this decision. The hub is your system’s brain, connecting all your cameras, sensors, door locks, and smart lights into one network. Some popular options operate on the Zigbee protocol, others use Wi-Fi directly, and some support Thread or proprietary systems. This choice matters because your cameras, motion sensors, and door sensors need to speak the same language as your hub.
Before buying anything, verify that the devices you’re considering actually list compatibility with your chosen hub or platform. Don’t rely on guessing or a salesperson’s assurance. Check the product specifications and read real reviews from people who’ve installed similar setups. When evaluating devices, ensure they support standardized communication protocols that enable reliable integration and reduce security vulnerabilities across your entire system. This is not a minor detail. Proprietary systems might seem convenient at first, but they lock you into one manufacturer and limit your flexibility if you want to upgrade individual components later.
Beyond protocol compatibility, consider the practical side.
How will these devices physically connect? Are you installing wireless cameras that need strong Wi-Fi signals, or wired cameras that require running cables through walls? Wireless is more convenient to install but demands reliable internet, while wired systems offer reliability but involve more complex installation. If you’re renting or don’t want to drill holes, wireless wins. If you want absolute reliability for critical entry points, wired cameras might be worth the effort.
Look at power requirements too. Battery-powered sensors are easier to place but need regular battery replacement, while powered devices require proximity to outlets. Most people end up with a mix of both depending on location. Also think about how many devices you actually need. Four or five well-placed cameras cover most homes effectively, but you might want additional motion sensors for specific areas, door and window sensors for entry points, and possibly a smart lock on your main entrance. Start minimal and expand later rather than overbuying redundant equipment.
Here’s a quick comparison of wired and wireless smart security system installation device options:
| Feature | Wired Devices | Wireless Devices |
|---|---|---|
| Installation | Requires cables, more complex | Simple, no drilling needed |
| Reliability | Very stable, few dropouts | Can be affected by Wi-Fi |
| Power Source | Needs outlets or hardwiring | Battery or plug-in |
| Flexibility | Limited to outlet proximity | Can be moved easily |
| Ideal Locations | Critical entry points, permanent | Rentals, hard-to-wire spots |
Make a spreadsheet listing each device you’re considering, its communication protocol, power source, mounting requirements, and compatibility with your chosen hub. This prevents buyer’s remorse and keeps you focused on what actually serves your needs. Price matters, but the cheapest device that doesn’t integrate properly costs more in frustration than a slightly pricier compatible option. Review customer support availability for your top choices. When you have a question at midnight on a weekend, you want responsive support. Finally, check warranty coverage and return policies before purchasing. Quality smart security devices typically come with at least one-year warranties, and reputable retailers accept returns within 30 days if you discover compatibility issues.

Pro tip:
Before committing to your full device list, buy one camera and one hub, set them up completely, and live with them for a week to ensure the app interface feels intuitive and the notifications work as expected. This small investment prevents buyer’s remorse and gives you confidence before spending significantly more.
Smart Security System Installation – Step 3: Prepare Your Space and Gather Tools
Proper preparation prevents poor performance, and that old saying rings especially true with smart security installation. Before you unbox a single device, take time to prepare your space physically and mentally. This means clearing the areas where you’ll work, gathering the right tools, and understanding your Wi-Fi network well enough to ensure new devices will connect reliably. Rushing through this step often leads to frustration when cameras won’t mount securely or sensors lose connection after a few days.
Start by surveying the actual spaces where you plan to install cameras and sensors. Look for obstacles like thick walls, metal fixtures, or dense insulation that could block Wi-Fi signals. Wireless smart security devices communicate through walls, but thick concrete or masonry weakens signals significantly. If you’re installing a camera in a detached garage or far from your router, you might need a Wi-Fi extender or mesh system to maintain strong connectivity.
Check your internet speed using a free online speed test. You want at least 5 Mbps upload speed for each camera you plan to monitor simultaneously. If you’re sharing bandwidth with a household of five people streaming video, gaming, and working from home, that upload requirement grows quickly. Now is the time to know your limitations so you can plan accordingly. Walk through your home and identify spots where your Wi-Fi drops or feels slow. These are places where security devices will struggle, and you’ll want to avoid them or address them before installation.

Gather your tools before you start mounting anything
You’ll need a cordless drill or driver with a variety of bits, a level to ensure cameras point in the right direction, a stud finder if you’re mounting to studs, a tape measure, and a pencil for marking. Many camera mounts come with anchors and screws, but having extras never hurts. If you’re running cables for wired cameras or power, you might need a fish tape to feed wires through walls, junction boxes for code compliance, and electrical tape. For outdoor installations, grab a weatherproof sealant to prevent water from seeping around cable entries.
Indoor installations are simpler, but outdoor work requires attention to drainage and weather exposure. Test your drill and screwdriver on scrap material first if you’re uncomfortable with tools. A mounted camera that wobbles or falls is worse than no camera at all. Consider your Wi-Fi router placement too. If it currently sits in a corner far from where you need coverage, moving it to a more central location or adding an extender might be the single best investment you make. Before touching any devices, log into your home Wi-Fi network and write down your network name and password. You’ll need these when connecting each device, and fumbling for this information while standing on a ladder is not fun.
Check your smartphone compatibility with your chosen security system.
Download the app and create an account before installation day. Some systems require you to set up accounts, invite users, and configure basic settings before the first device will even connect. Doing this prep work means when your camera is mounted and powered on, you can connect and test it immediately rather than discovering problems midway through the installation. Finally, set aside adequate time for this step. Smart security installation is not a one-hour project. Budget at least a full afternoon for mounting hardware, running any cables, and getting everything connected and tested.
Create a simple network diagram on paper showing your router location, planned camera positions, and approximate distances between them. This visual reference prevents you from mounting devices in dead zones and helps you decide if you need Wi-Fi extenders before you start drilling holes.
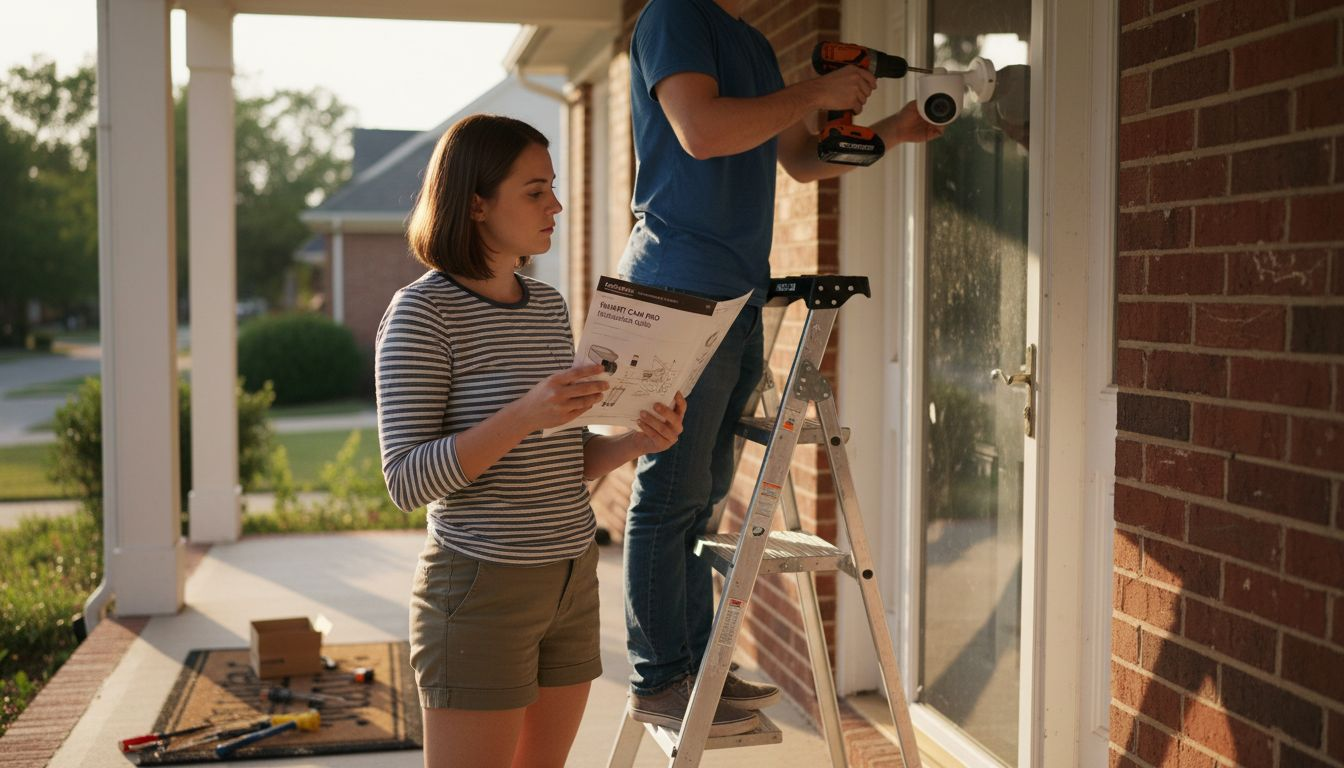
Smart Security System Installation – Step 4: Install and Connect Smart Sensors and Cameras
This is where your plan becomes reality. You’re about to mount cameras, position sensors, and connect everything to your network. The installation process itself is straightforward once you have the right approach and clear expectations. What matters most is taking your time, testing connections as you go, and not panicking when the first device takes longer to connect than you anticipated.
Start with your hub or central control device since everything else depends on it being online and accessible. Plug it in, place it in a central location where it can reach all your future devices, and follow the manufacturer’s setup instructions carefully. This usually involves downloading the app, creating an account, connecting the hub to your Wi-Fi, and updating firmware if needed. Don’t skip firmware updates even if they seem optional. They contain important security patches that protect your entire system. Once your hub is fully operational and showing as online in the app, you’re ready to add other devices.
Next, install door and window sensors since these are the simplest devices to set up. These battery-powered sensors typically require just peeling off adhesive backing and sticking them to frames and doors. Position the sensor and its magnet so they align properly when the door closes, usually about one-quarter inch apart. Test the connection through the app before moving to your next sensor. This test-as-you-go approach catches problems early rather than discovering them later when everything is mounted.
Now tackle your cameras, which require more planning
For indoor cameras, find locations that provide good sightlines to the areas you want to monitor without pointing directly at bright windows or light sources that will wash out your footage. Mount the camera securely using the provided bracket, ensuring it’s level and points exactly where you want it. For outdoor cameras, placement is more critical because weather and sunlight affect image quality significantly. Outdoor security cameras benefit from positioning under eaves or overhangs when possible to shield them from rain and direct sun that creates glare.
Mount cameras about eight to ten feet high when you can, as this height provides good coverage and makes tampering harder. Avoid pointing cameras directly into harsh sunlight or positioning them where tree branches will block the view seasonally. Once mounted, power on the camera and use the app to add it to your system. This process usually involves scanning a code on the device, connecting it to Wi-Fi, and assigning it a name and location. Be patient during this step because cameras sometimes take a minute or two to establish a connection, especially if they’re far from your router.
After each camera connects
Test its video feed and adjust the angle if needed before moving to the next device. Some cameras allow remote angle adjustment through the app, but if yours requires manual adjustment, do it now while you’re standing in front of the camera rather than discovering poor positioning later. Motion sensors are installed similarly to door sensors but require slightly more thought about placement. Position them to cover high traffic areas and entry points while avoiding false triggers from pets, swaying curtains, or headlights from the street.
As you add each device, verify that it’s communicating with your hub by checking the app. A device that connects during installation but drops connection later often indicates a Wi-Fi signal problem that you should address immediately, not ignore and hope resolves itself. If you encounter connection issues, move the device closer to the router or hub temporarily to confirm it works, then troubleshoot the original location using Wi-Fi extenders or repositioning the router.
Pro tip:
Before finalizing any camera placement, record a short video and review it in the app to see exactly what the camera captures, where it has blind spots, and whether the image quality matches your expectations under your home’s actual lighting conditions.
Smart Security System Installation – Step 5: Configure System Settings and Integrations
Now that your hardware is installed and connected, it’s time to transform a collection of individual devices into a cohesive smart security system installation that actually works the way you want. Configuration is where you define alerts, set recording schedules, establish automation rules, and connect your security system to other smart home devices. This step determines whether you’ll get useful notifications or be overwhelmed by false alarms, whether video stores locally or in the cloud, and whether your system feels like magic or feels like a burden.
Start by exploring the alert settings in your security app.
Most systems let you customize notifications per device, per user, and per time period. Do you want instant alerts for all motion detected, or only motion during nighttime hours? Should door sensor alerts wake you up at 3 AM, or just log silently? These decisions are personal and depend entirely on your lifestyle and tolerance for notifications. The wrong alert settings turn a helpful tool into an annoying distraction that you’ll eventually ignore, defeating the purpose entirely.
Create user accounts for anyone who should receive alerts or access footage. Assign different permission levels so your partner sees everything but a teenage babysitter can only view the front door camera. Most systems allow you to revoke access remotely, which is useful if someone moves out or you’re concerned about a contractor having access to your system. Configure recording settings next. Decide whether you want continuous recording that captures everything, event-based recording triggered by motion or door activity, or cloud storage versus local storage on your hub. Continuous recording uses more bandwidth and storage but ensures you capture every moment. Event-based recording saves space and bandwidth but might miss something happening between motion events. Most people find event-based recording offers the best balance of coverage and practicality.
Now explore automation and integration possibilities
Many systems integrate with voice assistants like Amazon Alexa or Google Assistant, allowing you to arm and disarm your system verbally or ask for camera feeds on smart displays. Smart home security workflows often benefit from integrations that automatically turn on lights when motion is detected at night, or unlock smart locks when you arrive home and disarm the security system simultaneously. If you’ve built a broader smart home with smart lights, thermostats, or door locks, connecting them to your security hub through automation creates a more cohesive experience. For example, you might set a rule that when a door sensor is triggered at night and no one is home, the system flashes all lights and sends an alert. These automations transform your system from passive monitoring to active protection.
Review privacy settings carefully since your security system records sensitive information.
Ensure that cloud storage is encrypted and that your account uses a strong, unique password. If your system offers local storage, this keeps recordings on your own network without sending video to cloud servers, which some homeowners prefer. Understand your system’s data retention policy. How long does footage store before automatically deleting? Can you manually save clips indefinitely? Many systems offer tiered storage where recent footage stays indefinitely while older footage deletes after 30 days. Test your integrations after setting them up. Ask your voice assistant to arm the system and confirm it actually arms. Trigger a motion sensor and verify that lights turn on as expected. These small tests now prevent frustration later when you’re actually relying on the system to work.
Finally, document your setup. Write down admin passwords, device names, automation rules, and alert settings in a secure location. If your phone breaks or you forget a password, this documentation prevents a stressful recovery process. Share relevant information with household members who need to know how to disarm the system, what alerts mean, and who to contact if something goes wrong. A smart security system is only as effective as the people using it, so clear communication matters tremendously.
Pro tip:
Create a test routine where you deliberately trigger motion sensors and door openings at different times to confirm that your notifications work, cameras record properly, and automations fire as expected before you depend on the system in a real situation.
Smart Security System Installation – Step 6: Test and Verify Full System Operation
Before you trust your new security system to actually protect your home, you need to verify that every component works as intended. Testing involves triggering sensors, checking notifications, reviewing footage quality, and confirming that automations execute properly. This step separates people who have a working system from people who have expensive decorations collecting dust in their homes.
Start your testing
Do it during daylight hours when you can safely and easily trigger each sensor without creating a false emergency. Walk around your home and open every door and window that has a sensor, noting whether the app shows the sensor as open within a few seconds of the actual opening. If a sensor takes more than ten seconds to report, investigate your Wi-Fi signal strength in that location. Check that notifications arrive on your phone within a reasonable timeframe, typically within seconds.
A notification that arrives five minutes later is useless for real-time awareness. Next, test your cameras by walking in front of each one and confirming that motion detection works and that you receive notifications as configured. Review the actual video feed through the app on your phone and on a computer or tablet if available. Does the video quality look acceptable? Can you read text or identify faces clearly enough for your purposes? Camera performance varies dramatically based on lighting conditions, so test during day and night to understand what to expect in real situations. Poor nighttime video quality often indicates you need additional infrared lighting or repositioning rather than a camera problem.
Test your alarm or siren if equipped
Start by manually triggering it in the app or through a test mode. You want to confirm the volume is adequate to hear from all areas of your home and that the sound is distinctive enough to recognize immediately. Have someone outside listen to verify the alarm is audible to neighbors without being so loud it damages hearing. Verify that arming and disarming the system works smoothly through both the app and any physical keypad or control panel.
Test different arming modes if available, such as armed away versus armed home, and confirm that appropriate sensors trigger alerts for each mode. When armed away mode is active, opening any door or window should trigger an alert. When armed home mode is active, perhaps only perimeter doors trigger alerts while interior motion sensors remain inactive. Test these distinctions thoroughly because activating the wrong mode accidentally defeats your security.
Now simulate real-world scenarios
Start by deliberately triggering your system at different times of day and night. Close all doors and windows, arm the system, wait five minutes, then open a door. Did the alarm sound? Did notifications arrive? Did footage record? Repeat this test with different sensors and during different time periods to ensure consistency. Test your integration with voice assistants or smart home hubs by verbally commanding your system to arm or disarm. Confirm that automations execute as configured, such as lights turning on when motion is detected at night or locks engaging when the system arms.
Check your system’s app on a different Wi-Fi network or cellular connection to ensure you can truly access it remotely. A system that only works when you’re home on your home Wi-Fi provides minimal security value. Verify that simulating real-world scenarios helps identify any operational gaps or unexpected behaviors before a genuine security event occurs. Review your recorded footage to confirm that video stores properly and that you can retrieve clips from the app. Test how long it takes to locate and share specific footage, since this matters greatly if you need to provide evidence to authorities or an insurance company.
Finally, update firmware for all devices to the latest available version if you haven’t already done so. Firmware updates contain important security patches and often improve device reliability. Schedule a monthly or quarterly maintenance routine where you test your system again to ensure nothing has degraded. A system that works perfectly on installation day but deteriorates over months of use serves no one.
Here is a summary of important aspects to verify when testing your smart security system:
| Test Action | What to Check | Why It Matters |
|---|---|---|
| Trigger sensors | Notification speed and accuracy | Ensures real-time alerts |
| Walk in camera view | Image clarity, notification timing | Confirms motion detection |
| Test alarm/siren | Audible reach throughout home | Guarantees safety awareness |
| Check app functions remotely | Full access from outside the home | Verifies remote monitoring |
Pro tip:
Document your testing results by taking screenshots of working alerts, recording video clips of successful automations, and noting any devices or features that required troubleshooting, creating a reference guide for future maintenance and a record that your system was functioning properly.
Elevate Your DIY Smart Security System Installation with Trusted Guidance and Tested Solutions
Installing a smart security system can feel overwhelming when you face challenges like selecting compatible devices, ensuring reliable Wi-Fi coverage, and configuring alerts that truly protect your home. You want clear answers on which cameras and sensors work seamlessly together and how to set up your hub without frustration. This guide emphasized pain points like avoiding compatibility issues, managing notifications intelligently, and verifying your entire system works before fully relying on it.
At Smart Home HQ, we understand these hurdles and provide detailed, unbiased reviews and step-by-step guides so you can confidently build a smart security system tailored to your needs. Explore our Smart Home Safety Archives for expert tips on securing your property. Dive deeper into integrations and automation at our Complete Smart Home Automation Master Guide Archives.

Don’t let confusion or uncertainty slow down your smart home security installation project. Visit Smart Home HQ now to access tested product recommendations and practical advice that make DIY installation easier and your home safer. Start creating the reliable, easy-to-manage security system your household deserves today.
Frequently Asked Questions
What should I assess before installing a smart security system?
Before smart security system installation, evaluate your home’s vulnerabilities and what you want to monitor. Walk through your home to identify entry points, valuable items, and potential weak spots. Note these areas to create a concrete assessment and checklist for your installation.
How do I choose compatible smart security devices for my system?
To choose compatible smart security devices, start with a central hub that connects all your devices and check for standardized communication protocols. Confirm that each device you consider lists compatibility with your chosen hub. Create a spreadsheet of the devices to track their features and compatibility to avoid issues later.
What tools do I need for installing a smart security system?
You will need tools such as a cordless drill, level, tape measure, and pencil for marking during installation. Gather additional tools based on your setup, such as anchors for mounting and a fish tape if running cables is necessary. Prepare these tools in advance to streamline the installation process and limit frustrations.
How can I test my smart security system after installation?
Test your smart security system by triggering each sensor and checking notifications for accuracy and speed. Walk in front of cameras to ensure motion detection works, and verify that alarms are audible throughout your home. Perform these tests during different times of the day to confirm reliable performance under various conditions.
What should I document after setting up my security system?
After setting up your security system, document admin passwords, device names, automation rules, and alert settings in a secure location. Sharing this information with household members ensures everyone knows how to interact with the system effectively. Regularly update this documentation as you make changes or add devices, keeping it current for reference.
Recommended
- Home Security Reviews for Your Family’s Safety
- Smart Home Security Workflow Guide
- SimpliSafe Home Security: Wireless DIY System with Monitoring
- Alarm System Archives – Smart Home HQ