Fumbling with old, unreliable thermostats can leave any homeowner frustrated and uncomfortable, especially when you’re trying to save energy in a busy city. Upgrading to a smart thermostat means embracing cost savings, reliable climate control, and a greener future with technology built for American homes. This guide breaks down each step in plain language so you can tackle the installation confidently, even if you’re new to DIY projects, while making smart thermostats work for your urban lifestyle.
Table of Contents
- Step 1: Gather Required Tools and Materials
- Step 2: Power Down and Prepare the Old Thermostat
- Step 3: Install and Connect the Smart Thermostat
- Step 4: Configure Settings and Integrate with Home System
- Step 5: Test Functionality and Optimize Performance
Quick Summary
| Key Point | Explanation |
|---|---|
| 1. Gather essential tools first | Prepare a screwdriver, drill, voltage tester, and other tools for a smooth smart thermostat installation process. |
| 2. Power down before removal | Safely turn off power at the circuit breaker to prevent electrical damage or personal injury during thermostat replacement. |
| 3. Label wires for accuracy | Use colored tape or stickers to label each wire before disconnecting, ensuring easy and correct connections during installation. |
| 4. Configure advanced features | After installation, connect to WiFi and explore settings like geofencing and adaptive learning for enhanced energy efficiency. |
| 5. Test thermostat functionality | Run performance tests to ensure accurate temperature control and optimize settings for comfort and energy savings. |
Step 1: Gather Required Tools and Materials
Before diving into your smart thermostat installation, you’ll need to collect a few essential tools and materials. Getting organized upfront will make the entire process smoother and more efficient.
Here’s what you’ll want to have ready before starting:
- Screwdriver (Phillips head and flathead)
- Drill with appropriate drill bits
- Voltage tester
- Electrical tape
- Wire stripper
- Level
- Your new smart thermostat
Knowing which wires you’re working with is crucial. Understanding thermostat wire colors will help ensure a successful installation. Most smart thermostats require a C-wire for continuous power, so verifying your system’s compatibility is key.
Here’s a quick reference of common thermostat wires and their functions:
| Wire Color | Purpose | Typical Label |
|---|---|---|
| Red | Power from transformer | R or Rc/Rh |
| White | Heat signal | W or W1 |
| Yellow | Cooling signal | Y or Y1 |
| Green | Fan control | G |
| Blue/Black | Common wire (C-wire) | C |
| Orange | Heat pump changeover valve | O/B |
Pro tip: Before purchasing a smart thermostat, check your existing HVAC system’s wire configuration to ensure seamless integration.
Typically, smart thermostats come with mounting hardware like screws, wire connectors, and detailed instructions. Energy Trust recommends confirming your heating and cooling system’s compatibility before beginning the installation process.
Pro tip: Take a clear photo of your existing thermostat wiring before disconnecting anything to use as a reference during installation.
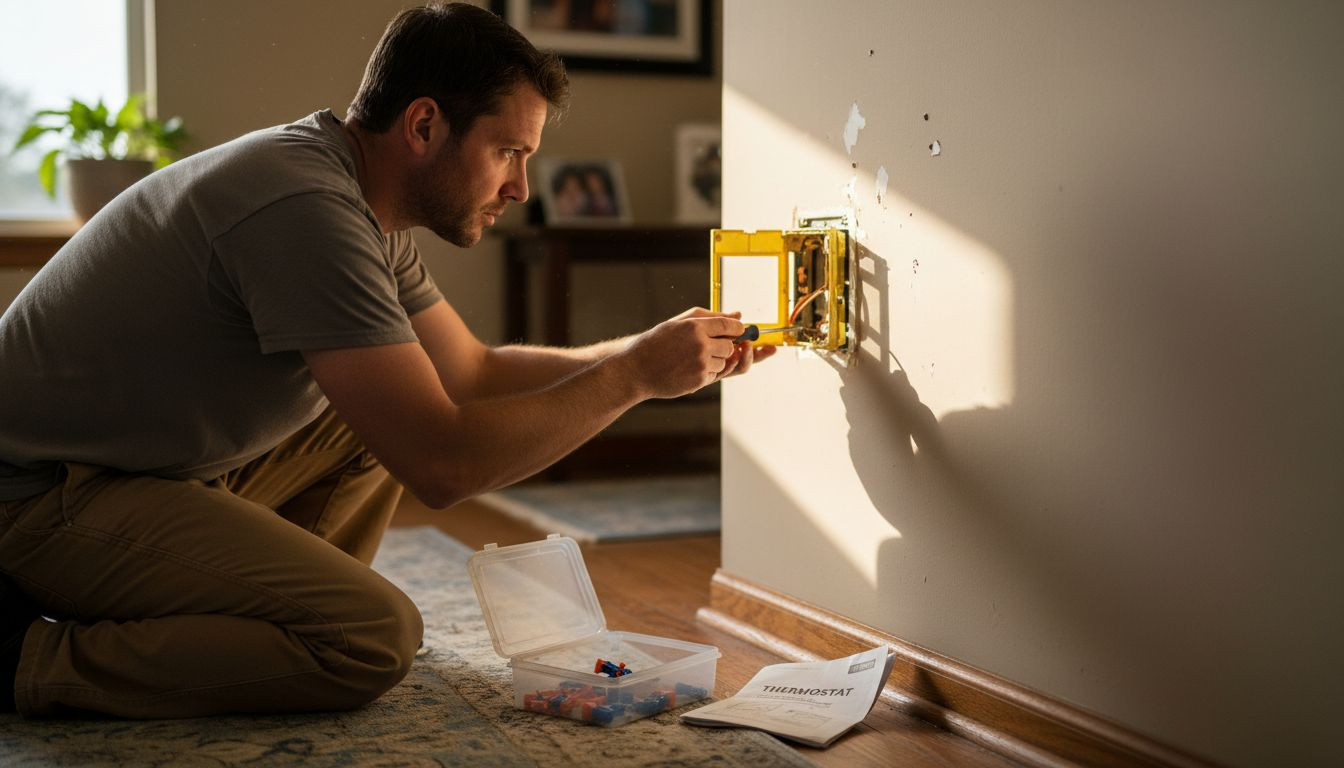
Step 2: Power Down and Prepare the Old Thermostat
Before removing your old thermostat, you’ll need to safely disconnect power and prepare the system for replacement. This critical step prevents electrical damage and ensures your personal safety during the installation process.
Start by locating your home’s main electrical panel. Turning off power to the thermostat involves switching off the circuit breakers connected to your HVAC system. If you’re unsure which breaker controls your heating and cooling, it’s best to turn off all HVAC-related circuits to guarantee complete power disconnection.
Here are the key steps for powering down safely:
- Identify the correct circuit breaker for your HVAC system
- Switch the breaker to the off position
- Confirm power is off using a voltage tester
- Remove the existing thermostat cover
Electrical safety is paramount when working with any home wiring system.
Energy guidelines recommend carefully disconnecting wires and labeling them before removal. Take a clear, well-lit photo of the existing wire configuration. This will serve as a crucial reference when installing your new smart thermostat.
Pro tip: Use colored tape or small numbered stickers to label each wire before disconnection to prevent confusion during the reinstallation process.
Step 3: Install and Connect the Smart Thermostat
With the old thermostat removed and power safely disconnected, you’re ready to mount and connect your new smart thermostat. This step transforms your home’s climate control into a more efficient and intelligent system.

Proper wire installation is critical for your thermostat’s functionality. Begin by carefully matching each wire to its corresponding terminal on the new mounting plate. Pay close attention to the wire labels you created earlier to ensure accurate connection.
Here are the key steps for installation:
- Attach the new mounting plate to the wall
- Align and connect each wire to its labeled terminal
- Secure wire connections tightly
- Snap the thermostat unit onto the mounting plate
Precision during wire connection prevents future system malfunctions.
After connecting the wires, you’ll need to configure your smart thermostat’s initial settings. Most models require you to connect to your home’s WiFi network and download a companion smartphone app for full functionality.

Pro tip: Keep the thermostat’s instruction manual nearby during setup, and consider taking a photo of your wire connections as a future reference.
Step 4: Configure Settings and Integrate with Home System
Now that your smart thermostat is physically installed, you’ll transition into configuring its advanced features and integrating it with your broader home ecosystem. This crucial phase transforms your device from a simple temperature controller into an intelligent climate management system.
Smart thermostats connect seamlessly with home automation platforms, enabling sophisticated scheduling and remote control capabilities. Begin by downloading the manufacturer’s smartphone app and creating an account, which will guide you through the initial setup process.
Key configuration steps include:
- Connect to your home WiFi network
- Name your thermostat device
- Set preferred temperature ranges
- Configure geofencing features
- Link additional smart home sensors
Precise configuration unlocks your smart thermostat’s full potential for energy savings and comfort.
Take time to explore advanced settings like adaptive learning and temperature scheduling. Many smart thermostats can automatically adjust based on your daily routines, potentially reducing energy consumption by learning your preferences over time.
The table below summarizes advanced smart thermostat features and their benefits:
| Feature | Description | Benefit |
|---|---|---|
| Geofencing | Detects presence via phone location | Reduces wasted energy |
| Adaptive learning | Learns your schedule automatically | Improves comfort |
| Remote control | Adjust via app anywhere | Increases convenience |
| Energy reporting | Tracks heating/cooling usage | Identifies savings |
Pro tip: Start with basic settings and gradually explore more advanced features to avoid overwhelming yourself during the initial setup.
Step 5: Test Functionality and Optimize Performance
With your smart thermostat now installed and configured, it’s time to verify its performance and fine-tune its settings for maximum comfort and energy efficiency. This final step ensures your new device operates exactly as intended.
Smart thermostats provide detailed performance reports that help you understand and optimize your home’s climate control. Begin by running a comprehensive system test, which typically involves checking heating and cooling cycles, sensor accuracy, and remote control responsiveness.
Key testing and optimization steps include:
- Verify temperature accuracy across different rooms
- Test remote control functionality
- Check geofencing performance
- Monitor energy consumption reports
- Adjust learning algorithms
Systematic testing reveals the true potential of your smart home technology.
Pay close attention to how the thermostat responds to different environmental conditions. Some smart thermostats can automatically adjust based on occupancy, external temperature, and your personal comfort preferences.
Pro tip: Keep a journal of your thermostat’s performance for the first month, noting any unexpected behaviors or energy consumption patterns to help you fine-tune its settings.
Master Your Smart Thermostat Installation with Expert Guidance
Installing a smart thermostat can feel overwhelming when faced with wiring challenges, ensuring system compatibility, and properly configuring advanced features. If you want to avoid common installation mistakes and fully unlock energy-saving benefits, detailed guidance is essential. From understanding wire colors to optimizing geofencing and adaptive learning, having trusted resources can make all the difference.

Explore in-depth reviews and user-friendly step-by-step installation guides at Smart Home HQ. Dive into our Core Device Categories Archives – Smart Home HQ for smart thermostats and related home automation devices. Expand your knowledge with the The Complete Smart Home Automation Master Guide Archives – Smart Home HQ and turn complexity into confidence today. Visit https://smarthomehq.house now and take control of your home’s climate with expert support and clear instructions.
Frequently Asked Questions
What tools do I need for smart thermostat installation?
To install a smart thermostat, you will need a screwdriver, drill, voltage tester, electrical tape, wire stripper, level, and your new thermostat. Gather all these tools before starting to streamline the process and ensure efficiency.
How do I safely power down my old thermostat?
To safely power down your old thermostat, locate your main electrical panel and switch off the circuit breakers that control your HVAC system. Confirm the power is off using a voltage tester before proceeding with the removal of the old thermostat.
How do I connect the wires to my new smart thermostat?
Connect the wires by matching each one to its corresponding terminal on the new mounting plate according to the labels you created. Ensure the connections are secure to prevent system malfunctions and confirm that everything is wired correctly before finalizing the installation.
What initial settings should I configure after installation?
After installation, connect your smart thermostat to your home Wi-Fi network and configure basic settings such as preferred temperature ranges, device names, and any geo-fencing options. Completing these settings will enhance your comfort and energy efficiency right from the start.
How can I test my new smart thermostat’s functionality?
Test your new smart thermostat by checking the temperature accuracy throughout different rooms, remote control functionality, and energy consumption reports. Systematic testing will help you identify any adjustments needed to optimize performance and ensure everything is working correctly.
What should I do if my smart thermostat is not functioning correctly?
If your smart thermostat isn’t functioning correctly, double-check all wire connections for secure placements and re-evaluate your settings in the app. Document any issues you experience and consider fine-tuning the configuration to enhance performance.
Recommended
- Best Smart Thermostat 2025: Top Choices Reviewed – Smart Home HQ
- Smart Home Thermostat Archives – Smart Home HQ
- Thermostat Archives – Smart Home HQ
- Best Smart Thermostats 2026 for Homeowners Explained
- Solar Thermal Installation Guide: Achieve Efficient Heating – Skan Plumbing & Heating